Post-Installation Setup
Post-Installation Setup
After completing the upgrade or initializing a fresh Monitor instance, follow these recommended steps to configure your deployment for production use.
Quick Start: Complete these 5 essential configuration steps in order:
Configure TLS for GUI - Secure web access
- Create Notification Channels
- Set up alerts
Set Monitor Name - Identify your instance
Configure Retention - Manage storage
Tune Disk Space - Prevent disk full
Advanced Security - Optional hardening
Configure TLS for Monitor GUI
Securing the Monitor web interface with TLS is essential for production deployments. Without TLS, all credentials and data transmitted to/from the GUI are sent in plaintext.
Steps
- Navigate to Monitor → Settings → Access tab
- Click Browse next to TLS certificate for GUI access
- Select your certificate file (PEM format:
.pemor.crt) - Click Browse next to TLS key for GUI access
- Select the matching private key (PEM format:
.pem,.crt, or.key) - Click Save to apply changes
The Monitor will automatically:
- Validate both files are properly formatted
- Verify the certificate and key match
- Restart the web server with HTTPS enabled
Verification
After saving, verify HTTPS is working:
curl -k https://<your-server>/
The -k flag temporarily accepts self-signed certificates. You should see Monitor's response.
Having trouble? See troubleshooting
Create Notification Channels
Configure at least one notification channel so alerts, system-health notifications, and scheduled reports have somewhere to be received.
Then follow Creating a new channel for the full configuration walkthrough.
Set Monitor Name
Assign a descriptive name to identify your Monitor instance in browser tabs, reports, and notifications.
- Navigate to Monitor →
Generaltab - Locate Monitor name field (default: "Monitor")
- Enter your desired name (max 30 characters)
- Click Save
- Browser tab title
- Auto Trigger report headers
- Channel notification footers
Configure Data and PCAP Retention
Control how long to retain event data and uploaded files (PCAPs) to manage storage.
Configure Event Data Retention
-
Navigate to Monitor →
Data Retentiontab -
Event Data Retention:
- Set Number of days to keep old events
- Default:
30days - Range:
0to730days - Use
0to disable automatic cleanup
-
PCAP Retention:
- Set Number of days to keep uploaded files
- Default:
30days - Range:
0to730days - Use
0to disable automatic cleanup
-
Click Save
- PCAP files consume significantly more space than event data
- Consider shorter retention for PCAPs (e.g., 7-14 days) vs events (30-90 days)
- For compliance requirements, archive critical PCAPs externally before they're deleted
Setting event retention above 160 days may impact Elasticsearch performance.
Tune Disk and Elasticsearch Space
Prevent disk space issues that could cause Monitor to stop accepting data.
Configure Disk Management
-
Navigate to Monitor →
System Healthtab -
Data Partition Disk Management:
Setting Description Warning threshold Triggers alert when free disk drops below this % Threshold for deleting old files Auto-deletes when free disk drops below this % (use 0to disable) -
Elasticsearch Disk Management:
Setting Description Warning threshold Triggers alert when ES free disk drops below this % Threshold for deleting old files Auto-deletes ES indices when free disk drops below this % (use 0to disable) -
Select notification channels for health alerts
-
Enable desired alerts:
- Disk Space Alert
- Connectivity Alert
- Advanced Alerts Engine Connectivity (optional)
-
Click Save
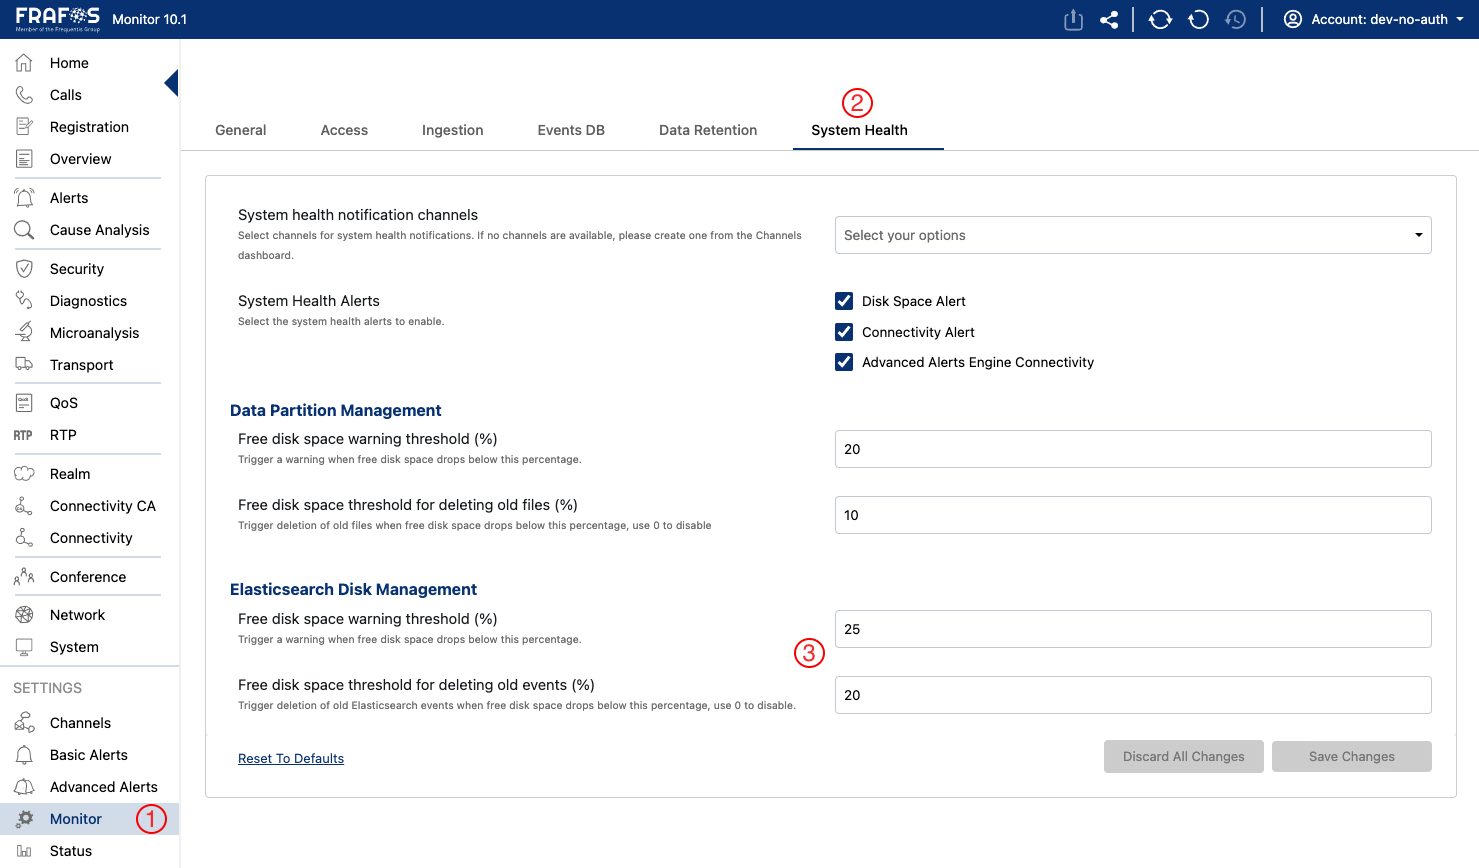
See System Health documentation for detailed information.
Recommended Security Configurations
Secure Connection for Events
Enable encrypted event ingestion to protect call data in transit.
-
Navigate to Monitor →
Ingestiontab -
Enable Encrypted Input:
- Check Enable receiving events only via encrypted input
- This blocks all unencrypted event connections
-
Upload Event TLS Certificates:
- Upload TLS certificate (PEM:
.pemor.crt) - Upload TLS key (PEM, PKCS8 format:
.pem,.key, or.crt)
- Upload TLS certificate (PEM:
-
Configure Peer Verification (optional):
- Select Peer certificate verification level
- Choose
verify peer certificatefor mTLS - Upload CA certificate if verification enabled
-
Configure Vector Ports:
Port Purpose Default Vector TCP port Non-TLS connections 5044Vector TCP port (TLS) Secure TLS connections 5045 -
Click Save

See Ingestion documentation for full configuration reference.
Elasticsearch Authentication
Secure communication between Monitor and Elasticsearch using username/password authentication.
About ES_USERNAME and ES_PASSWORD
Set the ES_USERNAME and ES_PASSWORD environment variables to enable authentication with Elasticsearch. These credentials allow Monitor to securely connect to your Elasticsearch cluster.
For a complete list of environment variables, see the Environment Variables Reference.
Enabling TLS Between Monitor and Elasticsearch
Encrypt traffic between Monitor and Elasticsearch by configuring TLS. See the Elasticsearch TLS Setup Guide for detailed instructions on enabling TLS between Monitor and Elasticsearch.
Additional Recommendations
- Backups: Schedule automated Elasticsearch snapshots. Store backups off-site or in cold storage. Test restoration procedures regularly. See Elasticsearch Snapshots
- Monitoring: Monitor Monitor's own health metrics. Set up alerts for High CPU/Memory usage, Slow Elasticsearch queries, Failed health checks
- Log Aggregation: Centralize Monitor logs with ELK or similar. Configure log rotation to prevent disk issues. Set up log-based alerts for errors
Next Steps
After completing setup:
- Test all notification channels deliver correctly
- Confirm TLS certificates are valid and trusted
- Document your configuration for team reference
- Set up regular maintenance schedule
Quick Reference
| Configuration | Navigation Path |
|---|---|
| TLS for GUI | Monitor → Access |
| Monitor Name | Monitor → General |
| Data Retention | Monitor → Data Retention |
| Disk Management | Monitor → System Health |
| Event Security | Monitor → Ingestion |